Chapter Four: Manipulating Objects
Naming Objects
You can assign a name to any object in a document. This name will
appear in the Object Viewer in the Style bar whenever the object is
selected. An
abbreviation indicating the object type will precede the name of the
object. Pressing the arrow to the right of the viewer will display a
drop-down
window with icons indicating the object type. If an object is not
named, the object type will be displayed in the Style bar viewer.
To name an object:
1. Choose Browser from Object
Management in the Edit menu.%!PI("useguide.mvb","help_editMenupic")
or
Click on the Object Viewer window with
the Content Menu mouse button.
or
Press the Backspace key on your keyboard.
The Browser dialog box appears.
The names (specific or, if unnamed, generic) of all objects in the
document are displayed in a list box, along with their status:
(N)ormal, (L)ocked,
or (H)idden.
If an object is currently selected, its name is highlighted in the list
box.
2. If the object you want is not currently selected, click on its
(generic) name in the list box to highlight it. When you select an
object name, the
corresponding object in the document becomes selected (surrounded by
handles).
If a group is displayed, double-click on the group name. A subdirectory
tree appears beneath the name, indicating the members of that group.
Highlight
the generic name of the object you want to name specifically.
3. Type in the desired name in the Object Name field, using up to
twenty-five (25) characters.
4. Click on Name to name the object.
Another way to name an object is to select it, highlight its name in
the Object Viewer window in the Style bar, then type over the name and
either
press Enter or point somewhere in the Drawing Area and click the left
mouse button.
Note:
Separate objects can be given the same name if desired.
Object Name Types
Two new features, the Object Browser and the Object Viewer in
the Style bar, have been supplied with icons to intuitively indicate
the type of objects
shown in their object list.
An explanation of the icons appears below.
|
Object Type:
|
Object Icon:
|
Named Object:
|
|
Symbol #XXXX
|

|
S > object name
|
|
Text
|

|
T > object name
|
|
Chart
|

|
C > object name
|
|
Extrude
|

|
E > object name
|
|
Open Shape
|

|
O > object name
|
|
Closed Shape
|

|
C > object name
|
|
Picture (.WMF)
|

|
P > object name
|
|
Image (.TIF)
|

|
I > object name
|
|
Group
|

|
G > object name
|
|
Blend
|

|
B > object name
|
|
Hole Group
|

|
H > object name
|
|
Mask Group
|

|
M > object name
|
|
Text on Shape
|

|
T > object name
|
|
Warp Object
|

|
W > object name
|
Moving an Object
Once you place an object in the drawing area, you can move it to any
location in your document. You simply drag
the object from one
place to another.
You can also use the Transform%!JI("useguide.mvb>second","help_Transform")
dialog box to move an object to a specific location.
You can use any of the View Options (Actual Size, Current Page, All
Pages, Zoom In, or Full Screen) when you drag an object to another part
of the
document.
Small objects that are selected (surrounded by handles) can be
difficult to drag at the All Pages scale. If you find yourself resizing
instead of
moving a small object, either deselect it and move it by pointing on it
or select it by pressing on both mouse buttons at the same time.
To move an object by dragging:
1. Point on any visible part of the object you want to move and hold
the mouse button.
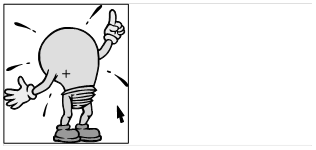 The
object’s bounding box, normally invisible, becomes visible as a
thin-lined rectangle.
If the visible part of the object is difficult to select, or if the
object is obscured by other objects, hold down the Ctrl
key as you
click on the object.
2. Drag the Pointer to move the bounding box to the desired location
for the object.
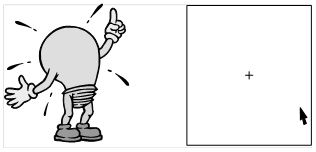
3. Release the mouse button.
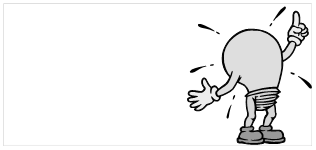
EXPRESS
moves the object to the new location.
To nudge or move an object horizontally or vertically using the
keyboard in small increments:
1. Point on any visible part of the object you want to move and hold
the Spacebar.
2. Press one of the arrow keys to move the object in the direction of
the arrow.
3. Release the arrow key and the Spacebar.
This method of moving is more accurate than dragging with a mouse.
Note:
You can cancel any move operation by pressing Esc before releasing the
mouse button.
Moving an Object Numerically
You can move an object numerically by specifying either an absolute or
relative position.
To set a numerical absolute position for an object:
1. Select the object you want to move.
2. Choose Transform from the Arrange
menu, or just press W
while holding down the Ctrl key. The Transform%!JI("useguide.mvb>second","help_Transform")
dialog box appears.
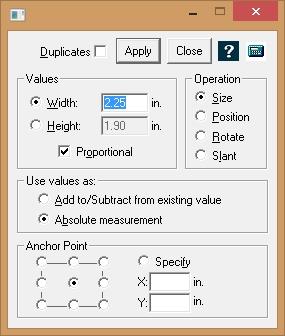
3. Choose Absolute measurement under Use
values as.
4. Click on Position in the Operation
section. The section changes, displaying the current position of the
selected
object.
5. Enter an X and Y
position for the object in the Values
section. Changing the X coordinate will
move the object left or right; changing the Y coordinate will move the
object up or down. The fixed point of the object will move in reference
to the upper left-hand corner of the page.
6. Choose a reference point in the Fixed point
section. The reference point is the point where X and Y are reckoned.
For example, if
you want the upper left corner of the object at the specified location,
click the upper left point in the Fixed Point section.
7. Click on Apply to move the object.
To set a numerical relative position for an object:
1. Select the object you want to move.
2. Choose Transform from the Arrange
menu. The Transform dialog
box appears.
3. Choose Add to/subtract from existing value
under Use values as.
4. Click on Position in the Values
section. The section displays entry boxes for X and Y coordinates.
5. Enter a value in the X and Y
position fields. Enter a positive number in the X field to move the
object to the
right, or a negative number to move the object to the left. Enter a
positive number in the Y field to move the object down, or a negative
number to
move the object up. The fixed point of the object will move in
reference to the previous location of the object at that
fixed point.
6. Do not change the reference point in the Fixed point
section. You want the addition or subtraction of value to apply to the
same
reference point in effect before the object is moved.
7. Click on Apply to move the object.
Numeric Moving Plus Duplicating
You can combine numeric moving and duplicating to place a duplicate
object at a specified location in a document.
To duplicate an object numerically, follow the instructions under Moving
an Object Numerically
.%!JI("useguide.mvb>second","MoveObjectNumeric") Before you exit
the Transform dialog box, click on Duplicates
so that the check
box is checked. When you click on Apply,
a duplicate of the object will be placed at the position specified. If
more than one
duplicate is specified, they will all be stacked on top of one another
at the new location.
Move Again
After using the Transform dialog box to numerically move or to
numerically move and duplicate an object, you can select another object
and choose Transform Again from the Arrange
menu (or simply press W
while holding down the Shift key) to
perform the same transformation on that object.
Undo Move
When you move an object in the drawing area, you can undo the move just
made. Pull down the Edit menu
%!PI("useguide.mvb","help_EditMenupic") and choose Undo
Move/Size. Perform the same action by simply pressing Z
while
holding down the Ctrl key.
Changing the Stacking Order
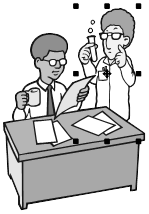
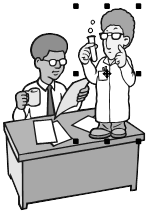
The stacking order is the order in which objects are drawn on the
screen. EXPRESS keeps track of each object’s
place in the stacking order.
When drawing a new object or using the group command to group objects, EXPRESS
places the object in front of all others on the screen, on the
top of the “stack.”
You can change the stacking order by bringing an object to the front or
sending it to the back of the stack.
 To move
an object to the front or back of the stack:
1. Select the object you want to move.
2. Pull down the Arrange menu and choose
either Bring To Front or Send
To Back. The object(s) is
redrawn at the front or back of the stack. The shortcut keys are,
respectively, Ctrl+F and Shift+F.
or
3. Choose Stacking Order from the
Arrange menu. Highlight the object or objects that you
want to reorder, then choose
the Bring To Front or Send
To Back button. The object(s) is redrawn at the front
or back of the stack. The shortcut
keys are, respectively, Ctrl+F and Shift+F.
Alternatively, after highlighting the object(s) you can release the
mouse buttons and move the cursor in the list of objects on your page.
When between
objects, the Stacking Order cursor appears. Click when the cursor shows
the desired placement.
Sizing an Object
You can size an object in several ways.
• Proportional sizing makes the object larger or smaller without
changing its width-to-height proportions.
• Non-proportional sizing stretches or compresses the object in one
dimension only (horizontally or vertically), changing its
width-to-height
proportions.
• Numeric sizing makes an object the exact height and width you
specify.
EXPRESS
lets you flip an object and size it at the same time. By dragging an
object handle toward and beyond its opposite handle, an object is
flipped during
interactive resizing.
Note:
You can cancel any size operation by pressing Esc before releasing the
mouse button. After resizing, the change can be canceled by pressing
Ctrl+Z.
Sizing from the Center of an Object
EXPRESS
allows you to size an object away from its center point, either
proportionally from a corner handle, or nonproportionally from a side
handle. Select an
object handle, press the Shift key, and drag
the handle.
Proportional sizing away from one corner handle (the default for
proportional sizing) is done as above but without pressing the Shift or
Control key.
Proportional Sizing
To size an object proportionally:
1. Select the object.
2. Point on one of the object’s corner handles and hold the left mouse
button to select the handle.
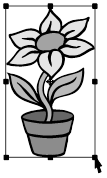
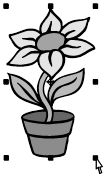
The object’s bounding box becomes visible as a thin-lined rectangle.
{sizing2.wmf}
3. Drag the Pointer%!JI("useguide.mvb>second","help_pointer")
to change the size of the bounding box.
To make the bounding box larger, move the Pointer away from the object.
To make the bounding box smaller, move the Pointer toward the center of
the box.
{sizing3.wmf}
As you size the bounding box, w and h indicators%WandH in the numeric
bar display the current width and height. (When you are not sizing an
object, the w and h
indicators change to x and y indicators,%XandY displaying the current
coordinates of the cursor.)
4. When the bounding box is the size desired, release the left mouse
button.
EXPRESS
redraws the object at the new size.

Note:
If you hold down the shift key as you drag one of the object’s corner
handles the object will size proportionally from its center outwards.
Proportional Sizing Plus Flipping
You can size an object proportionally and flip it at the same time.
To simultaneously size proportionally and flip an object horizontally
and vertically:
1. Select the object.
2. Point on one of the object’s corner handles and hold the left mouse
button.
3. Hold down the Alt key as you move the
Pointer toward the opposite corner handle. When you reach it, the
bounding box flips over.
4. Continue moving the Pointer until the flipped bounding box is the
size you want.
5. Release the left mouse button.
EXPRESS
draws the flipped object at its new size, in proportion to the
original.
Non-Proportional Sizing
To stretch or compress an object by sizing it nonproportionally:
1. Select the object.
2. If you want to stretch or compress the object horizontally, point on
the left or right midpoint handle.
If you want to stretch or compress the object vertically, point on the
top or bottom midpoint handle.
If you want to stretch and compress both at once, hold down the Ctrl
key as you point on a corner handle.
Hold down the left mouse button.
The object’s bounding box, normally invisible, becomes visible as a
thin-lined rectangle.
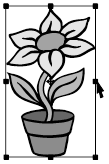
3. Drag the cursor to change the size of
the bounding box.
If you grabbed the top or bottom midpoint handle, move the Pointer up
or down.
If you grabbed the left or right midpoint handle, move the Pointer left
or right.
4. When the bounding box is the desired proportion, release the left
mouse button.
EXPRESS
redraws the object at the new proportions.

Note:
If you hold down the shift key as you drag one of the object’s top
bottom or left or right midpoint handles the object will size
nonproportionally from
its center outwards.
Non-Proportional Sizing Plus Flipping
You can size an object nonproportionally and flip it at the same time.
To simultaneously size non-proportionally and flip an object:
1. Select the object.
2. Point%!JI("useguide.mvb>second","help_pointer")
on one of the object’s midpoint handles
%!JI("useguide.mvb>second","help_obhandles") and hold the left
mouse button.
3. Move the Pointer toward the opposite object handle. When you reach
it, the bounding box flips over.
Moving the Pointer past the diagonally opposite corner flips the object
both vertically and horizontally. Moving the Pointer past the nearest
corner
flips it in one direction.
4. Continue moving the Pointer until the flipped bounding box is the
size you want.
5. Release the left mouse button.
EXPRESS
draws the flipped object at its new size.
Sizing Plus Moving
You can size and move an object in one operation.
To simultaneously size and move an object:
1. While you are sizing an object, press the Content Menu button
without releasing the left mouse button.
2. With both buttons held down, drag the mouse to move the bounding box
to the desired location for the sized object.
3. Release the Content menu button, but keep the left mouse button held
down. You can now continue dragging to resize the object.
Sizing Plus Duplicating
You can size and duplicate an object in one operation.
To simultaneously size and duplicate an object:
1. Choose Duplicate from the Arrange
menu.
or
Click on the Duplicate tool in the
toolbox.
2. Begin sizing the (duplicate) object, then press the Content Menu
button without releasing the left mouse button. The original object is
not
affected.
3. With both mouse buttons held down, drag the mouse to move the
bounding box to the desired location for the duplicate object.
4. Release the Content menu button, but keep the inside button held
down. You can now continue dragging to resize the duplicate at its new
location.
5. When you are done sizing, choose Duplicate
in the Arrange menu, or click on the
Content menu button to restore the
Pointer.
Numeric Sizing
You can size an object numerically by specifying either an absolute or
a relative size.
To set an absolute size for an object numerically:
1. Select the object you want to size.
2. Choose Transform from the Arrange
menu. You can also press Ctrl+W
or click on the x or y
button in the Numeric bar at the bottom of your screen.
The Transform%!JI("useguide.mvb>second","help_Transform")
dialog box appears.

3. Select or deselect Proportional in
“Values.”
4. Choose Absolute measurement under “Use
values as.”
5. Choose Size in the Operation
section. The section changes, displaying the current size of the
object.
6. Specify a value in the width and height fields. The current unit of
measure - inches, picas, or centimeters — is displayed at the right of
the width
and height fields. (If you selected Proportional values, you can set
only width or height; EXPRESS calculates the
corresponding proportional
value when you click on Apply.)
You can change the unit of measure in the View Options
dialog box (accessed from the View menu
).
7. Click on Apply.
To set a relative size for an object numerically:
1. Select the object you want to size.
2. Choose Transform from the Arrange
menu (alternately, you can press W
while holding down the Ctrl key, or click
on the x or y
button in the numeric bar at the bottom of your screen.)
The Transform%!JI("useguide.mvb>second","help_Transform")
dialog box appears.
3. Choose Add to/subtract from existing value
under Use values as.
4. The section changes, displaying a percentage scale and a Proportional
check box.
5. To scale the object non-proportionally, click on the Proportional
check box to remove the check mark in the box. The Scale box
changes to Height and Width boxes.
Enter the desired percentages in the Height and Width boxes.
6. Click on Apply.
Numeric Sizing Plus Duplicating
You can combine numeric sizing and duplicating to create a duplicate
object at a specified size. To size numerically and duplicate, follow
all but the
last step of the instructions under “Numeric Sizing.”
Before you click on Apply to exit the Transform%!JI("useguide.mvb>second","help_Transform")
dialog box, click on Duplicates so that a
check mark appears in the check box. When you click on Apply,
a duplicate of the selected object
is drawn at the size specified.
Size Again
After using the Transform dialog box to numerically size or to
numerically size and duplicate an object, you can select another object
and choose
Transform Again from the Arrange menu to
perform the same transformation on that object.
Undo Sizing
To undo a size operation just performed, pull down the Edit
menu %!PI("useguide.mvb","Help_EditMenupic") and choose Undo
Move/Size, or press Ctrl+Z
.
Making an Object Proportional
EXPRESS
provides an easy way to restore the default proportions of a symbol or
text object you have stretched or compressed by sizing
nonproportionally.
Freeform objects can be restored to the relative proportions
established during the last editing session.
To make a non-proportional object proportional,
EXPRESS reduces the object’s width or height to
restore the original
proportions. When you make a text object proportional, EXPRESS
sets the object’s condense/extend (compress and stretch) value to 100
while
keeping its type size, leading, and character spacing values intact.
To make an object proportional:
 1. Select
the object that you want to make proportional.

2. Choose Make Proportional from the Arrange
menu. The object’s original proportions are restored.
Aligning Objects
The Align command in the Arrange menu lets you precisely align objects.
First select the objects you want to align, then choose the appropriate
align option.
The following example illustrates how each option affects the alignment
of the selected objects in the sample document below:
To align objects:
1. Select the objects you want to align.
2. Choose Align%!JI("useguide.mvb>second","help_Align")
from the Arrange menu.
The Align%!PI("useguide.mvb","AlignDB")
dialog box appears.
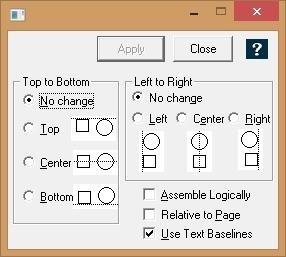
The dialog box provides options for the various ways to align objects.
3. Choose the alignment reference by clicking on the appropriate
reference button.
• Objects are aligned in relation to the top-most object for top align,
the left-most object for left align, etc. unless Relative
to page is checked.
• Assemble logically reassembles a
composite clip-art object that has been temporarily broken apart, viz.,
to recolor its parts.
• Relative to page aligns objects in
relation to the page.
• Use text baselines aligns text objects
in relation to their baselines. It has no effect on other objects.
4. Choose the desired alignment by clicking on the appropriate check
box.
5. Click on Apply.
The dialog box disappears. The objects align.
Undo Alignment
To undo an alignment operation just performed, pull down the Edit
menu %!PI("useguide.mvb","help_EditMenupic") and choose Undo
Move/Size, or just press Z
while holding down the Ctrl key.
Align Left or Right
Choose Left to align all selected objects
with the left edge of the left-most selected object (Objects reference)
or with the left
edge of the page (Page reference).
Choose Right to align all selected
objects with the right edge of the right-most selected object (Objects
reference) or with the right
edge of the page (Page reference).
Align Left Align Right
Align Top or Bottom
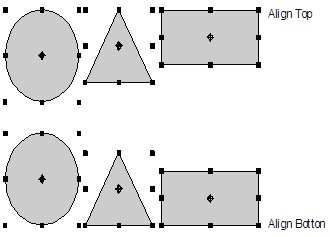
Choose Top to align all selected objects
with the top edge of the highest selected object (Objects reference) or
with the top edge of
the page (Page reference).
Choose Bottom to align all selected
objects with the bottom edge of the bottom-most selected object
(Objects reference) or with the
bottom edge of the page (Page reference).
|
|
Align Top
Align Bottom
|
Align Vertical (left to right)
Choose Center (left to right) to center
all selected objects around an imaginary vertical axis between the
left-most and right-most
object edges (Objects reference) or around an imaginary vertical axis
down the center of the page (Page reference).
Align Horizontal (top to bottom)
Choose Center (top to bottom) to center
all selected objects around an imaginary horizontal axis:
• Between the highest and lowest object edges (Objects reference)
• Across the center of the page (Page reference).
Align Center
Objects can be center-aligned about a horizontal axis (top to bottom)
and/or about a vertical axis (left to right).
Align (Assemble) Logically
Choose Assemble Logically to align
composite symbols, accent symbols, and freeform objects. You must
select the Objects reference to
use the Assemble Logically option.
Composite symbols are composed of two or more individual symbols.

U.S. Outline
+
State Lines
=
Composite
4103 4395 Symbol of U.S.
Composite symbols aligned using Assemble Logically
Accent symbols are used to add color or a shading pattern to portions
of a symbol.

Crystal Ball
+
Reflection
+
Pedestal
=
Accented
4394 6337 6338 Symbol
Accent symbols aligned using Assemble Logically
Before you align these symbols, change each symbol’s attributes as
desired. After the symbols are aligned, use Group from the Arrange
menu to combine the symbols into a single object.
Freeform objects aligned using Assemble Logically
Freeform objects can also be aligned using Assemble Logically. When a
symbol or text object is converted to freeform objects, or when you
draw a
freeform object with the line or curve tools, relative position
information is saved for each freeform object.
EXPRESS
uses this information to align individual freeform objects, even after
they have been moved, scaled, stretched, slanted, and/or rotated. If
parts of
the composite object have been deleted, EXPRESS
will logically align the rest. If you accidentally move or otherwise
manipulate any freeform
objects, use Assemble Logically to realign the objects.
When you edit any freeform object, the position information saved for
the object is updated. This establishes a new alignment position for
the edited
object.
Note:
If you drastically enlarge a group of objects that are aligned
logically, recalculation may cause minor alignment problems if you
print the document on
a high-resolution device. To ensure that the objects are perfectly
aligned at the enlarged size, ungroup the objects and use the Assemble
Logically
command.
Align Text Using Baselines
When aligning text and objects, the “Use Text Baselines” option allows
you to ignore descenders on the text. (Descenders are such strokes as
the lower
portion of a “p” or “y.”) The option has no effect on other types of
objects.

Text and an object aligned at the Bottom with “Use Text Baselines” off.
When the option is on, text is aligned along the baseline of the text
object.

Text and an object aligned at the Bottom with “Use Text Baselines” on.
Duplicating an Object
You can create a duplicate of any object by using the Duplicate command
from the Arrange menu (or the duplicate
tool in the Toolbox)
to drag a copy of the object to another
location.
You can also use the Transform dialog box
to create duplicates with specified sizes, positions, slants, and
rotations.
You can use any of the View options (Actual Size, Current Page, All
Pages, Zoom In, or Full Screen) when you duplicate an object. Small
objects that
are selected (surrounded by handles) can be difficult to drag at the
All Pages scale. If you find yourself resizing instead of moving a
small object,
either deselect it and move it by pointing on it or select it by
pressing on both mouse buttons at the same time.
Note:
When editing freeform objects, the Duplicate function allows you to
duplicate a sequence of line and/or curve segments.
To duplicate an object by dragging:
1. Choose Duplicate from the Arrange
menu.
or
Click on the Duplicate tool in the
toolbox.
The duplicate cursor appears.
2. Position the Duplicate cursor on the
object you want to duplicate and hold the primary mouse button.

The object’s bounding box, normally invisible, becomes visible as a
rectangle.

3. Drag the Pointer to move the bounding
box to the desired location for the duplicate object.
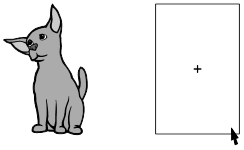
4. Release the mouse button.
EXPRESS
draws a duplicate of the object at the new location.
{duplic1d.wmf}
5. Follow steps 2 through 4 for each object you want to duplicate.
6. To turn off the duplicate function, choose Duplicate
from the Arrange menu, or press Esc,
or
click on the Pointer in the toolbox, or press the Content Menu button
in an open part of your screen.
Note:
You can cancel a duplicate operation by pressing Esc before releasing
the mouse button.
Flipping an Object
EXPRESS
lets you flip objects both horizontally and vertically.
When you flip an object horizontally, you produce the object’s mirror
image. When you flip an object vertically, you turn it upside down.
To flip an object horizontally or vertically:
 {flip.wmf}
Original Flipped Flipped
Orientation Vertically Horizontally
1. Select the object(s) you want to flip.
2. Choose Flip Vertically or Flip
Horizontally from the Arrange menu.
EXPRESS
flips the selected object(s).
Rotating an Object
You can rotate symbol, text, and freeform objects interactively by
dragging the Rotate cursor, or you can specify a precise angle.
To rotate an object interactively:
1. Select the desired object.
2. Click on the Rotate tool in the
toolbox. The Pointer turns into the Rotate tool, and the Center Point
cursor appears.
3. If desired, drag the Center Point cursor to another location.
4. Point on any object handle and drag. The object rotates about the
point marked by the Center Point cursor. The r
indicator in the
numeric bar shows the current degree of rotation as you rotate the
object.
5. Release the left mouse button.
The rotated object will have a rotated bounding box with handles at the
appropriate points.
6. When you are done rotating, click the Content menu button,
press Esc, or choose the Pointer tool. EXPRESS
will remember the degrees of rotation until the object is converted to
freeform.
To rotate an object a specific number of degrees:
1. Select the desired object.
2. Choose Transform from the Arrange
menu. The Transform dialog
box appears on the screen.
You can also click on the r button in the
numeric bar at the bottom of your screen to display the Transform
dialog box. If you do so, EXPRESS takes you past
steps 3 and 4.
3. Choose either Add to/subtract from existing value
or Absolute under Use values as. The
first lets you rotate the
object a specified number of degrees relative to the object’s current
angle of rotation; an Absolute value lets you rotate the object a
specified
number of degrees from a vertical axis through the center point.
4. Choose Rotate in the Operation
section. The section displays an entry box for a rotation angle. If
Absolute value
is selected, the box displays the current rotation angle of the object.
5. Type the number of degrees you want the object rotated in the Angle
field. You can specify the angle in tenths of a degree, if desired.
Enter a
positive number to rotate the object clockwise, or a negative number to
rotate counterclockwise.
6. Specify the center point around which the object is to rotate:
Choose one of the Fixed Points.
or
Type the X and Y coordinates of the center point, relative to the
current position of the current center point.
7. Click on Apply.
Note: You may encounter problems when rotating imported BMP and TIFF
images in EXPRESS. After rotation, a grey box may appear in place of
the imported
image. If you are using a PostScript printer, the rotated image will
print correctly despite the display of the grey box on the screen.
However,
non-PostScript printers will print the grey box rather than the rotated
image. To avoid this problem, you may want to convert the bitmap to
some other
format before importing into EXPRESS.
Moving the Center Point
When you move the center point of an object, the location of the Center
Point cursor is not saved with the other attributes of the object.

In general, when you select the Rotate tool,%!JI("useguide.mvb>second","help_rotatetool")
the Center Point cursor%CtrCursor will
always appear in the center of the object. If, however, you deselect a
rotated object (by giving a click of the left mouse button) and do not
dismiss
the Rotate tool (by giving a click of the Content Menu button),
the Center Point cursor will reappear wherever it was last placed. Any
object can be rotated about that center point.
|
Objects rotate about the
Center Point Cursor,
which can be moved.
|
|
For complicated illustrations, you may want to preserve the location of
a center point. To do so, select the cross-hair symbol (symbol 1620)
from the
selection box in the Symbol%Symbol dialog box. Place the cross-hair
symbol at the point around which you want to rotate the object. Use theBrowser
to name the point for easy reference and to lock it in
place. Select the working object and click on the Rotate tool. Drag
the Center Point cursor to the point marked by the cross-hair symbol.
When you have completed the illustration, hide the
cross-hair and any other construction aids.
Rotating Plus Duplicating
You can combine numeric rotation and duplicating to create a duplicate
object at a specified rotation. To rotate numerically and duplicate,
follow all
but the last step of the instructions under Rotating an
Object.
Click on Duplicates so a check mark
appears in the check box. When you click on Apply,
a duplicate of the selected
object is drawn with the rotation specified.
Rotate Again
After using the Transform dialog box to rotate numerically or to rotate
and duplicate an object numerically, you can select another object and
choose Transform Again from the Arrange
menu to perform the same transformation on that object.
Undo Rotate
To undo a rotation just performed, pull down the Edit menu
and choose Undo Rotate, or press Ctrl+Z.
Slanting an Object
You can slant an object by dragging the Slant Cursor,
or you can specify an exact number of degrees.
Do not confuse slanting an object with italicizing a text object. To
italicize text, choose Type from the Styles
menu, then click on Type Styles.
Text cannot be slanted unless the text has been
freeformed, and the effect is
different from that achieved by italicizing.
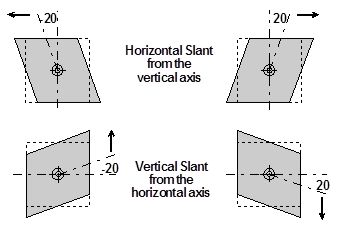 {slant.wmf}
To slant an object by dragging the Slant Cursor:
1. Select the desired object.
2. Click on the Slant tool,%!PI("useguide.mvb","help_slanttool")
second in the Rotate flyout in the toolbox. The Pointer turns into
the Slant cursor, and the Center Point%ctrcursor cursor appears.
3. If desired, drag the Center Point cursor to another location.
4. Point on any object handle and drag. If you drag on a side midpoint
handle you can slant the object vertically; if you drag on the top or
bottom
midpoint handles you can slant the object horizontally.
If you drag on a corner handle you can slant the object both
horizontally and vertically at the same time.
The h and v
indicators in the numeric bar show the current angle the object is
slanted horizontally and vertically.
5. Release the left mouse button.
6. When you are done slanting, click the Content menu button,
press Esc, or choose the Pointer tool.
To slant an object a specific number of degrees:
1. Select the desired object.
2. Choose Transform from the Arrange
menu. The Transform dialog
box appears on the screen.
You can also click on the h or v
button in the numeric bar at the bottom of your screen to display the
Transform
dialog box.
3. Choose either Add to/subtract from existing value
or Absolute under Use values as. The
first lets you slant the
object a specified number of degrees from its current slant angle; an
Absolute value lets you slant the object a specified number of degrees
from its
vertical position.
4. Choose Slant in the Operation
section. The section displays entry boxes for horizontal and vertical
slant angles.
If Absolute value is selected, the boxes display the current slant of
the object. (If you entered the Transform dialog box by clicking on the
h: or v:
buttons, this step is unnecessary.)
5. Type the number of degrees you want the object slanted in the
Horizontal and Vertical Slant fields. You can specify the angle in
tenths of a degree,
if desired. Enter a positive number to slant the object clockwise, or a
negative number to slant counterclockwise.
6. Specify the center point (the intersection of imaginary vertical and
horizontal axes from which the slant angles are applied to the object).
Choose one of the Fixed Points.
or
Type the X and Y coordinates of the center point.
If you slant the object horizontally, the slant axis will be an
imaginary vertical line running through the Center Point. If you slant
the object
vertically, the slant axis will be an imaginary horizontal line running
through the center point.
7. Click on Apply.
Slanting Plus Duplicating
You can combine numeric slanting and duplicating to create a duplicate
object at a specified slant.
To slant numerically and duplicate, follow the instructions under Slanting
an Object%!JI("useguide.mvb","SlantObject") to slant an
object a specific number of degrees.
Before you click on Apply, click on Duplicates
so that a check appears in the check box. When you click on Apply,
a duplicate of the selected object is drawn with the slant specified.
Slant Again
After using the Transform%!JI("useguide.mvb>second","help_Transform")
dialog box to numerically slant or to numerically slant and
duplicate an object, you can select another object and choose Transform
Again from the Arrange menu
to perform the
same transformation on that object.
Undo Slant
To undo a slant just performed, pull down the Edit menu
%!PI("useguide.mvb","help_EditMenupic") and choose Undo
Slant
.
Blending Objects
The Blend command in the Effects menu
%!PI("useguide.mvb","help_effcMenupic") (or second in the Effects
flyout in the Toolbox) allows
you to create a variety of graphic effects by distributing copies of an
object between specified beginning and ending objects. The objects that
define
the beginning and end of the blend can be sized, stretched, slanted,
rotated, and colored to create striking illustrations.
Blend may be used to create, among other things:
• Three-dimensional effects
• Copies of freeform objects to form background patterns
• Transformations from one shape to another.
Blending Text, Symbol, or Freeform Objects
1. Select the object to be blended.
2. Choose Blend from the Effects
menu,%!PI("useguide.mvb","help_effcMenupic") or choose Blend
from
the Object Effects flyout in the Toolbox.
The Blend%!JI("useguide.mvb>second","help_Blend")
dialog box appears.
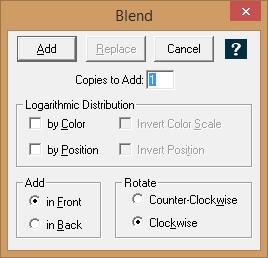
3. Enter the desired number of copies (up to 201) in the Copies
to Add field.
The number you enter specifies the number of copies added to the
original object. A low number will create several distinct copies. A
high number will
create many copies for a different effect.
4. Choose the desired distribution scales for color and position from
the Logarithmic Distribution section of the Blend dialog box.

5. Click on either the In Front or In
Back option in the Add section.
Each blended copy will be positioned as specified in front of or behind
the previous copy as it is blended from the original to the final
object.

6. Click on either the Counter-Clockwise
or Clockwise option in the Rotate
section.
The rotation option is used for the blend if either the original and/or
the final object has been rotated.
7. Click on Add. A
duplicate of the original object appears on top of the original.
8. Manipulate the original object and the duplicate to define the
beginning and ending positions of the blend. Change the attributes of
the original
and/or duplicate object to achieve the transition effects desired.
9. Choose Complete Blend from the Effects
menu,%!PI("useguide.mvb","help_effcMenupic") or click
the Content menu
button.
The blend is calculated and displayed on the screen. Attributes, such
as size, color, rotation, and slant will be blended from the original
to the
final object.
The objects in the blend are automatically grouped and “Blend” is
displayed in the status bar when the group is selected. The blended
objects can be
ungrouped by choosing Break Apart from
the Effects menu.
The blend command can be used to blend one freeform shape into another:
 {blend3.wmf}
1. For this effect, first position the two freeform objects where you
want them for the blend.
2. Select both objects. Follow steps 2 through 9 above.
Blending Two Different Freeform Shapes
1. Edit the two freeform objects that you want as the beginning and end
of the blend. Change size, position, and styles to achieve the effect
desired.
(You can use the Cvt to Freeform command in the Draw menu
to convert symbol and text objects to freeform.)
2. Use Shift+click or Block
Select to select the two objects. They must be either
two open shapes or two closed
shapes.
The first item you select will be blended into the second.
3. Choose Blend from the Effects
menu. The Blend dialog box appears.
4. Enter the number of copies desired in the blend (up to 201). The
Logarithmic, Add, and Rotate commands in the dialog box all work the
same as for a
blend between two identical shapes.
5. Click on Add.
6. Choose Complete Blend from the Effects
menu, or click the Content Menu button.

A blend from one shape to another works best when the two objects have
the same number of segments, when corresponding segments are the same
type (line
or curve), and when the two objects have corresponding start/end
points.
If these items do not match between the two objects, the blend may
produce unexpected results.
The Shape Info command in the Draw menu
gives you information about the makeup of freeform objects. This
information can be useful
when editing freeform objects prior to a blend.
To match the number and type of segments, freeform edit the objects,
adding and deleting handles as necessary. Use the Cvt Line
<<->> Curve
command to make line segments correspond to line segments and curve
segments correspond to curve segments.
See Editing Freeform Drawings for information on freeform editing,
adding and deleting handles, and using the Cvt Line
<<->> Curve command.
To match the start/end points, freeform edit each object and choose the
Set Start/End Point command from the Draw menu. The start/end point is
automatically selected; you can then click on another point to make it
the start/end point, if desired. (This is valid for closed shapes
only.)
If the blend produces unexpected results after matching segments and
start/end points, you may need to reverse the drawing order of one of
the objects.
To do this, select the object and choose Reverse order
of points from the Draw menu.
Note:
Once a blend has been ungrouped, it cannot be altered using the Replace
command.
Logarithmic Distribution
The Logarithmic Distribution section of the Blend dialog box defines
the scales used while creating the blended objects. The default blend
uses a
linear scale for both color and position, and creates evenly spaced
copies with a uniform color distribution. In this case, the four items
in the
Logarithmic Distribution section are turned off.
To choose a logarithmic distribution by color and/or position, click on
the appropriate option; a check mark will appear in the box to show
that the
option is turned on. Using a logarithmic scale for position creates
copies that are more closely positioned near the original object and
spread out
near the final object. Using a logarithmic scale for color creates
copies with a gradual change in color near the original object and a
rapid change
near the final object.
The Invert Position Scale and Invert Color Scale options reverse the
logarithmic scales to place the gradual change in color or the more
closely
positioned copies near the final object rather than the original.
Replacing a Blend
The Replace command in the Blend dialog box allows you to alter the
styles of the original and final objects, the number of copies,
rotation, and type
of blend. The blend is then recalculated using the updated information.
To replace a blend:
1. Select the blend.
2. Choose Blend from the Effects
menu.%!PI("useguide.mvb","help_effcMenupic")
3. Choose the desired specifications from the Blends second dialog box,
and click on Replace.
The previously blended objects will disappear, leaving the original and
final objects to define the beginning and ending positions of the new
blend.
These objects can be left unchanged or they can be modified to create a
new effect.
4. Choose Complete Blend from the Effects
menu,%!PI("useguide.mvb","help_effcMenupic") or click
the right mouse
button.
The new blend will be displayed.
Note:
If the original blend has been ungrouped with the Break Apart command,
the Replace command will not be available.
Cutting Holes in Objects
You can use the Merge command to automatically cut a hole in an object.
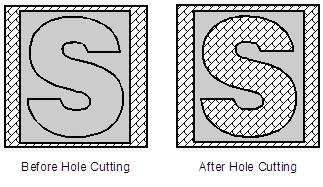
You must use freeform objects (closed shapes) to cut a hole, and the
object in which the hole is to be cut must also be freeform. If
necessary, use the
Cvt to Freeform command on text and symbol objects to turn them into
closed shapes. The top-most object cuts the hole in the underlying
object.
To use an open shape,%!PI("useguide.mvb","OpenShape")
first use the editing tools to close it.
To cut a hole in an object:
1. Convert to freeform the hole-cutting object and the object to be cut
by selecting each and choosing Cvt to Freeform
from
the Draw menu or by pressing F8.
2. Position the “hole” object on top of the other object by choosing Bring
to Front from the Arrange
menu or by
pressing Ctrl+F.
3. Use Shift+click or Block Select to
select the objects.
4. Choose Merge from the Effects
menu.%!PI("useguide.mvb","help_effcMenupic")
or
Click with the mouse on the Effects tool in the Toolbox.
5. Choose Cutout (Hole) and click on Apply.
If the top (hole) object only partially overlaps the bottom object, a
hole will be created in the area of overlap.
{hole2.wmf}
To cancel the effect of a cutout, select the object and choose Break
Apart from the Effects menu.
Note:
The filling rule used with closed shapes can affect the result of a
cutout command.
Clipping Paths in Objects
The Merge command lets you use one object as a “cookie cutter” to cut
out other objects. Unlike those used in cutting a hole, objects used in
a
clipping path, or mask, need not be freeform.
To cut a clipping path:
1. Select the object to be used as the “cookie cutter.”
2. Place the object on top of the object or objects you want to clip
and use Shift+click%help_Shiftclick or Block
Select%!JI("useguide.mvb>second","help_BlockSelect")
to select all of the objects.
3. Choose Merge from the Effects
menu.%!PI("useguide.mvb","help_effcMenupic")
or
Click with the mouse on the Effects tool in the Toolbox.
4. Choose Clipping Path (Mask) and click
on Apply.
The objects under the cookie cutter are clipped, and can be seen
through the cutter. Any part of the objects not under the cutter are
not drawn.
{hole3.wmf}
If the “cutter” only partially overlaps the other objects, the objects
will be clipped in the area of overlap:
{hole4.wmf}
To cancel the effect of a clipping mask, select the object and choose Break
Apart from the Effects
menu.
Note:
The filling rule used with closed shapes can affect the result of a
clipping path command.
Warping Objects
EXPRESS
Warp/Perspective command in the Effects menu lets you quickly create
special effects with symbol, text, and freeform objects.
To warp an object:
1. Select the object.
2. Choose Warp/Perspective from the Effects
menu, then choose Add from the submenu. The
Warp/Perspective dialog box appears, and
the selected object is redrawn using the current Warp settings.
or
Hold down the mouse on the Effects flyout in the Toolbox, drag the
cursor to the fifth or last icon, and release it
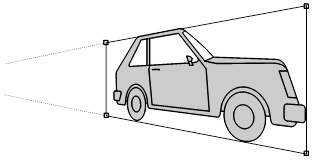
A warp envelope with point handles appears around the object.
The various Warp parameters (shape, symmetry, orientation, and
compress/stretch) are illustrated on buttons in the dialog box.
3. Choose the parameters desired. You can select parameters by clicking
on the icons, or by choosing commands from the menu bar in the dialog
box.
As you choose Warp parameters, the selected object changes to show the
effects of the choices.
4. You can click on the title bar of the dialog box and drag it to
another part of your screen. Also you can minimize the Warp dialog box
(if desired)
by clicking on the arrow at the upper right of the dialog box. This
leaves only the title bar, menu, and action buttons visible. If
necessary, point on
the title bar of the dialog box and drag to move it out of the way.
If desired, move the Warp by holding the Shift key and dragging a
handle.
5. Drag the point handles on the warp envelope to adjust the Warp. The
current Orientation and Symmetry settings determine the direction you
can move
handles, and whether or not other handles are automatically adjusted.
Each time you drag a handle and release the mouse button, the Warp
effect is calculated and the object is redrawn at its new shape. The
Warp dialog box
remains on your screen until you click on the Done button.
6. If desired, size the Warp proportionally by holding the Control key
and dragging a corner handle.
7. When the object is warped as desired, click on Done. The name “Warp
Object” appears in the Style bar.
Note:
You can warp multiple objects by Grouping them before warping. However,
if the group is then ungrouped, the warp is removed from all the
objects in the
group.
Warp Shapes
Warp shapes can be chosen from the Warp Shapes menu
(under the Options menu in the Warp dialog box) or by clicking on the
appropriate
Shape button. Warp shapes can be modified using the Symmetry,
Orientation, and Compress/Stretch tools, and by manipulating the point
handles on the
warp object.
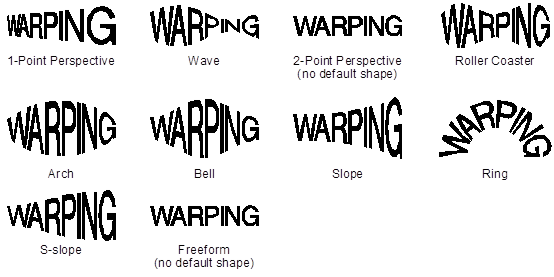
A special case is the Freeform shape. Freeform displays both point
handles and control points on any Warp envelope, allowing for greater
modifications
to the shape. You can select any Warp shape and then choose Freeform to
display control points on that shape.
Warp Symmetry
The Symmetry settings let you make parallel and mirrored adjustments to
the Warp bounding box. Symmetry can be chosen by clicking on the
appropriate
icon or by selecting the Symmetry command in the Shapes menu.%!PI("useguide.mvb","ShapeMenu")
No Symmetry
lets you move points individually on the Warp envelope.
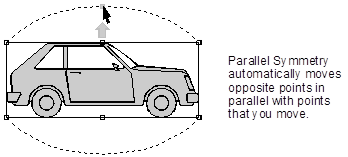
Parallel symmetry
lets you move opposite points in parallel.
Mirrored symmetry
lets you move opposite points in opposite directions.
Warp Orientation
The Orientation settings determine the direction you can warp an
object. Orientation can be chosen by clicking on the appropriate button
or by
selecting the Orientation command in the Warp shapes menu
in the Warp dialog box.
Vertical
places handles on the top and bottom of the Warp bounding box. You can
move these handles vertically.
Horizontal
places handles on the left and right of the Warp envelope. You can move
these handles horizontally.
Compress/Stretch and Auto Perspective
The Compress/Stretch settings let you
compress or stretch an object along a left/right or top/bottom axis to
achieve different
perspective effects, such as making objects appear to recede in the
distance. Compress/Stretch can be chosen by clicking on the appropriate
icon or by
selecting the Compress menu.
Auto Perspective must be turned off to select a Compress/Stretch
setting. When you select a Compress/Select of Left, Right, Left/Right,
or Center, a
scroll bar lets you adjust the amount of compression or stretch you
want to apply to the object.


Auto Perspective calculates the mathematically and visually correct
compress/stretch based on the Warp shape and symmetry chosen. Auto
Perspective is
available only when using the one-point and two-point perspective
shapes.
Warp Options
The Options menu in the Warp dialog box
contains warp options. When an option is active, a check mark appears
next to it in the menu;
selecting the option a second time removes the check mark and toggles
it off.
When using the Freeform shape, Allow Horizontal Moves
allows handles to be moved both horizontally and vertically when
vertical
orientation is chosen. This option changes to Allow
Vertical Moves when horizontal orientation is chosen.
When off, these options will
prevent you from accidentally compressing or stretching portions of an
object along the axis of the compress/stretch.
Maintain Lines
controls the conversion of lines into curves. When Maintain Lines is
active and an object is warped, all lines in the object are maintained
as lines.
When Maintain Lines is not active and an object is warped, some lines
in the object may be warped into curves to faithfully render the shape
of the
Warp object.
Show Perspective
Lines
displays dashed perspective lines when using the one point and two
point perspective Warp shapes.
{Warp15.wmf}
The dashed perspective lines meet at the vanishing point(s); you can
move point handles at the vanishing point(s) to adjust the Warp.
All of your option choices are immediately applied to the warp object.
The dialog box remains on your screen until you click on the Done
button.
Note:
Vanishing points are often outside of the active document area. You
will need to move the Warp to reposition the vanishing point(s) inside
the
document. Do this by selecting any handle and dragging while holding
down the Shift key.
Re-Warping an Object
Objects may be warped multiple times.
To warp an object that has already been warped:
1. Select the object.
2. Choose Warp/Perspective from the Effects
menu. A sub-menu appears; choose Add.
3. Warp the object as desired.
4. Click on Done.
Editing a Warp Object
After a Warp has been applied to an object, it can be edited if
desired.
To edit a Warp object:
1. Select the object.
2. Choose Warp/Perspective from the Effects
menu. A sub-menu appears; choose Edit.
or
Hold down the mouse on the Effects flyout in the Toolbox, drag the
cursor to the fifth or last icon, and release it.
A warp envelope with point handles appears around the object.
3. Warp the object as desired.
4. Click on Done.
Warping Rotated and Slanted Objects
If a Warp object has been rotated or slanted, it is displayed during
editing without the rotation or slant. When the Done button is clicked
the object
is redrawn with the correct rotation or slant.
Undoing a Warp
To undo a warp:
1. Select the Warp object.
2. Choose Break Apart from the
Effects menu.
or
Choose Warp/Perspective from the Effects
menu. A sub-menu appears; choose Remove.
Copying Warp Effects to Other Objects
To copy a Warp effect from one object to another:
1. Select a Warp object.
2. Choose Warp/Perspective from the Effects
menu. A sub-menu appears; choose Save.
3. Select another object.
4. Choose Warp/Perspective from the Effects
menu. A sub-menu appears; choose Recall.
The object is
redrawn with the saved Warp effect.
Extrude
EXPRESS
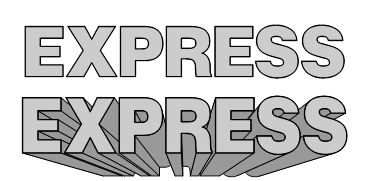
’ Extrude command lets you quickly create three-dimensional effects
using freeform objects or freeformed text and clip art.
Note:
The best results are achieved when you extrude text or simple objects
without “detail lines” or overlapping filled areas. Also since Extrude
converts
flat 2D objects into 3D artwork, you should not try to extrude artwork
that already depicts a 3D view, such as a cube or the perspective view
of an
airplane.
To extrude a freeform object:
1. Select the object.
2. Choose Extrude from the Effects
menu, then Add/Edit; or hold down the cursor on the
Effects flyout and release it
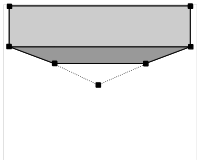
on the fourth icon. The Extrude dialog box appears, displaying an
extruded box ready to receive changes. This box has handles which are a
3D version of
object handles, and they allow you to adjust the extrusion in the same
way.
If Auto Apply is on, the selected object is redrawn using the current
Extrude settings. Auto Apply allows the interactive display to be
updated
quickly, showing you the immediate effect of your adjustments. With
Auto Apply off, you must click on Apply then Done to see the effect.
3. You can drag the corner point handles on the extrusion, a side
segment, or the vanishing point to adjust the extrusion.
Holding down Ctrl when dragging extrusion
point handles sizes only that face, not the entire extrusion.
4. When the object is extruded as desired, click on Done.
The name “
 Extrusion’’ appears in the Object Viewer in the
status bar.
An extrusion can be edited by selecting Edit
from the Effects/Extrude menu.
Specifying Extrude Options and Values
The Specify By setting allows you to
select one of two methods of interactively modifying the extrusion. The
numeric values of the
extrusion depth and vanishing point position are automatically updated
as you drag parts of the extrusion interactively. Alternatively, you
can enter
values directly into the boxes (or use the scroll arrows) and the
extrusion will be changed just as if you had dragged it with the mouse.
Trackball
, the first method of interactively adjusting an extrusion, acts as if
the extrusion were at the center of an invisible trackball. Dragging
anywhere on
the extrusion has the same effect as if you were to place your finger
on the trackball there and rotate it. You can rotate the extrusion up
to 360
degrees in any direction in space. While dragging, a wireframe box is
displayed. If you are unsure if you are looking at the front or the
back of the
extrusion, release the mouse button to display the solid box again.
Holding down Shift and then dragging the trackball drags the trackball
and extrusion on the page without changing the rotation.
In Trackball mode, dragging one of the four handles on the front face
of the extrusion proportionally sizes both the front and back faces of
the
extrusion. Dragging one of the four handles on the back face of the
extrusion changes the depth of the extrusion (the distance between the
front and
back faces). In trackball mode, there is no vanishing point.
Vanishing Point
, the second method of interactive adjustment, does not allow you to
rotate the extrusion in 3D space, but allows you to change the size and
placement
of the front and back faces, either directly or by moving the vanishing
point of the extrusion.
You can switch from Trackball to Vanishing Point mode and back, and the
appearance of the extrusion will revert to the state that it was in
when you
were previously in that mode. In both modes, the same number of Undo
levels are available as in freeform drawing/editing and in
Warp/Perspective, so
you can Undo trackball rotations, vanishing point movements, etc.
Reset
lets you undo your extrusion to the original default setting for the
mode in which you are currently working (Trackball or Vanishing Point).
Perspective,
which is applicable only in Vanishing Point mode, allows the back face
to be smaller than the front face, so that the extrusion appears to
recede to a
vanishing point. If Perspective is turned off, the front and back faces
have the same size and there is no vanishing point.
Show Vanishing Point
toggles display of the vanishing point lines and handle when in
Vanishing Point mode.
X:
lets you change the x coordinate (horizontal position) of the vanishing
point.
Y:
lets you change the y coordinate (vertical position) of the vanishing
point.
Depth
lets you change the depth (thickness) of the extrusion. (Depth does not
move the vanishing point.)
Side color
lets you change the color of the extrusion’s sides to one of the named
fill colors. The front face of the extrusion will be the color of the
original
object.
Previewing an Extrusion
The preview section of the Extrude dialog box lets you see the effects
of your work in several different ways.
Wireframe
lets you view an outline 3D box that is a simplified view of the
extrusion. The object and vanishing points are still manipulated in the
same ways
while in wireframe mode. The colors will reappear after Done is
selected. Using Wireframe is very fast, because you don’t have to wait
for the object
itself to be extruded, nor for other objects behind the extrusion to
redraw each time you make a change. Select Apply to preview the final
extrusion.
Solid box
preview mode lets you view a solid 3D box that is a simplified view of
the extrusion. The solid box makes it easier to visualize the effect of
the
extrusion in 3D, but is slower since objects behind the extrusion must
be redrawn each time you make a change. Select Apply to preview the
final
extrusion.